
How to convert the Dunkelstadt module "Rockgate"?
I like to create a moveable entrance in the rock, hidden by a waterfall.
Hint: The waterfall looks better if you fix it onto the watersurface. I this example I wanted to be able to move the waterfall in case a minature wants to pass the gate.

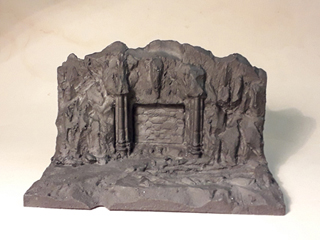
Here are some pictures of the delivery form:

That's the sideview:

-
Step 1
I remove the wall which shall become the door from the module with a sharp cutter knife.

Afterwards I wide the pond towards the gate and create a little creek to let the water flow out of the pond.


Hint: You may use the debris from widening the pond to create a new shoreline for the pond.
-
Step 2
I smooth the surface of the wall and make the missing gaps between the stones with a ballpen.


-
Step 3
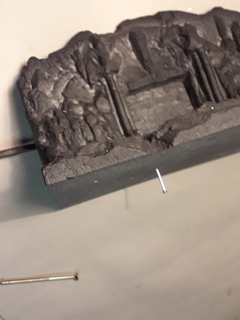
For the mechanism I beed a nail, a screw and a screwdriller. I press the nail through the floor plate at the position where the mechanism has to be.


Now I hold the removed wall in position and push the nail from the bottom through the floor plate. That's how I mark the right position of the mechanism on the wall. Now I carefully drill the screw through the wall and remove it again afterwards.

-
Step 4
Now I drybrush the wall in different greys and paint the ornaments in silver and black.


I also drybrush the rest of the module in different greys and use some green where I want to have water later on.


-
Step 5
When the colour is dry I drill the screw into its position. From the bottom of the module through the hole in the floor and the wall into the rock above the gate.

-
Step 6
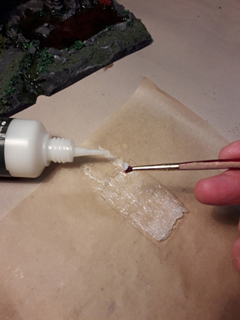
I transfer the meassures of the waterfall onto a piece of baking paper.


I paint the waterfall with watereffects from Ziterdes onto the baking paper. Make the upper corners a bit longer to get a better possibility to glue the waterfall onto the rock.

Watereffects will dry transparent, that's why I use some white colour and another layer of watereffects to simulate foam.

-
Step 7
While the waterfall drys again I decorate the module with different flock and cast 2k-Water-gel from Ziterdes into the pond. The region of the wall where the waterfall should come down I paint with watereffects. Hint: The 2k-Gel is very fluis so you better don't cast too much, otherwise your pond may overflow through the channel and little creek onto the table. I do the channel and the little creek with watereffects.

-
Step 8
As I did with the waterfall on the baking paper I brush the dries watereffects with white to simulate foam. afterwards I paint another layer of watereffects onto it.


-
Step 9
After everything has dried I can pull the waterfall from the baking paper and glue it onto the rock.


Befor e you glue you should test if everything fits and have a look, where the fall hits the surface of the pond. This place I also paint with layers of watereffects, white colour and again watereffects.


-
Step 10
Now I cover the passage from the glued waterfall to the water on the rock with layers of watereffects, white colour and again watereffects.


The same I do with the region where the fall hits the surface of the pond.


Hint: If you like to keep the waterfall moveable you better bend it to the backside to let the foam on the ponds surface dry.


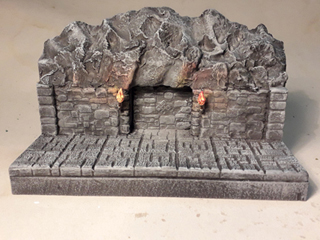
Now some pictures of the finished module:


-
Have fun with constructing and painting
Yours Team
Thomarillion