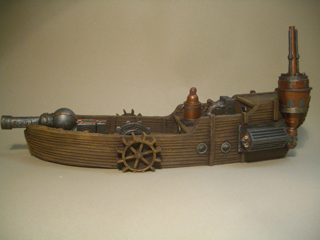
How to convert the hull Caravel.
-
Used tools and materials::
Cutter knife, acrylcolors, brushes, ballpen, Dremel tool, glue, filler
The delivery form of the hardfoam hull of the caravel looks like this:

I like to convert it to a steampunk canonboat:

-
Prologue
There are many ways and possibilities to convert the hull.
I decided to show what you can build with some of the steampunk models out of the huge Thomarillion range.
-
Step 1
You can use the "Brewkettle" to build a big bow canon.
The little extention at the front of the kettle disapears by sanding it away or like I did by drilling a hole into the bottom of the chimney.
That stabilizes the muzzle when I glue it later.


-
I place the canon (without muzzle) in position and remove unwanted material from the bow of the hull the Dremel tool.
You can remove the stonestructure at the base of the kettle with that tool too or just fill the gaps with filler.

-
Step 2
I like to have a big chimney machinery at the portside of the ship.
The models I used are "Unipolargenerator", "Plasmatank" und "Phasenconverter".
To bring the "Unipolargenerator" in position I have to cut off a part of the rearmost beam where I mark what I have to remove with a pen.

Afterwards I smooth the area and glue the "Unipolargenerator" in position.


-
To convert the "Phasenconverter" int a chimney I drill a hole into the top of the model.

Now I glue the bottoms of the "Phasenconverter" and the "Plasmatank" together.


With the Dremel tool I create space for that big chimney.
I fill the gaps with filler after I glued the chimney into its position.


-
Step 3
On starboard I want to place the model "Switching device".
Like on the other side I mark the part I have to remove from the beam and smooth the area before glueing the device.


-
Step 4
Behind the canon I like to have the model "Turbinewheel" to simulate the gear for the paddle-wheels.
Again I mark the position and smooth the area.
I use the model "Millwheel" for the boats paddle-wheels and cut them at the waterline.


-
I glue to pieces of round wood into the gaps between the "Turbinewheel" and the ship's sides to simulate the axis.
The paddle-wheels find their position on the outside of the hull.


-
Step 5
With the Dremel tool I drill some pits for several "Scuttles".
The model "Pressuretank" becomes its position on the middle deck. Like I did with the canon I remove the stonestructure at the base of the model with filler and Dremel tool.


-
Step 6
I start the paint job with a dark brown ground coat.

-
Step 7
And finally the paint job itself.
I drybrush the wooden parts. With this technic you paint from dark to light and the lighter the color the dryer the brush should be.
The trick is to hold the brush flat, so you only hit the upper regions of the surface with color.
Only painting all the machines with their tubes, rivets and ornaments takes a bit longer.
-
Here are some pictures of the finished convertion:


-
Here are some pictures of the finished convertion:


-
We wish you a lot of fun with constructing and painting.
Your team
Thomarillio
